
Hey everyone!
I’m happy to say that this week has been super productive! I finished my first C2C baby blanket (check out my step-by-step C2C crochet tutorial), picked up a couple of unfinished projects, finished setting up the nursery for my baby, and started learning how to design my own graphs to make patterns out of them in the future. I’d say that’s a win!
After spending a couple of hours yesterday working on designing a new graph, I decided to go ahead and make a tutorial for how to actually read a graph for crochet. Graphs are necessary for colorwork (making simple or intricate color designs or lettering in crochet). Working from a graph is also known as tapestry crochet. I’ll be making a post talking more in depth about tapestry crochet pretty soon so definitely check back in for that one.
It might seem a bit intimidating at first but I promise you it’s easier than it looks!! Once you learn to read a graph, you’ll be able to turn simple pictures into beautiful blankets, scarves, and intricate color designs. It’s definitely a skill worth learning, even if you’re still a beginner crocheter.
The cool thing about graphs is that they don’t necessarily have to be designed for crochet for you to be able to use them in a project. You can use perler bead graphs, cross stitch and embroidery graphs, and even pixel art once you get the hang of it.
I talked about graphs in my corner to corner crochet tutorial from last week, and it’s worth mentioning that while you can use the same graph to work either C2C crochet or regular tapestry crochet, the method is different. In this tutorial I’ll teach you how to read a graph for standard crochet and for C2C as well, as well as the difference between the two.
Ready to get started?
Let’s dive in!
Reading a graph for regular tapestry crochet: Understanding the grid
To start with, this is a regular color graph.

And this is a crochet graph.
Notice how there are numbers running along each side of this graph. Each number represents a row and each square represents a stitch. The numbers along the top and bottom determine the width of the graph (22 squares) and the ones along the sides represent the height (26 squares). This makes it easy to visualize and determine the size of your finished graph, depending on what size hook and yarn you’re using.
You could use either graph to crochet with, but naturally the graph specifically designed for crochet with the row numbers listed will be much easier to follow and keep up with your stitches!
As long as your graph is divided into a grid of equal squares, you can use it to crochet. Simple enough, right?
You’ll typically always want to go with single crochet when crocheting with graphs. Single crochet is versatile and neat, allowing you to make clean, tidy color changes without any gaps in your stitches.
Where to start?
It can be tricky to know what point in the graph you should start.
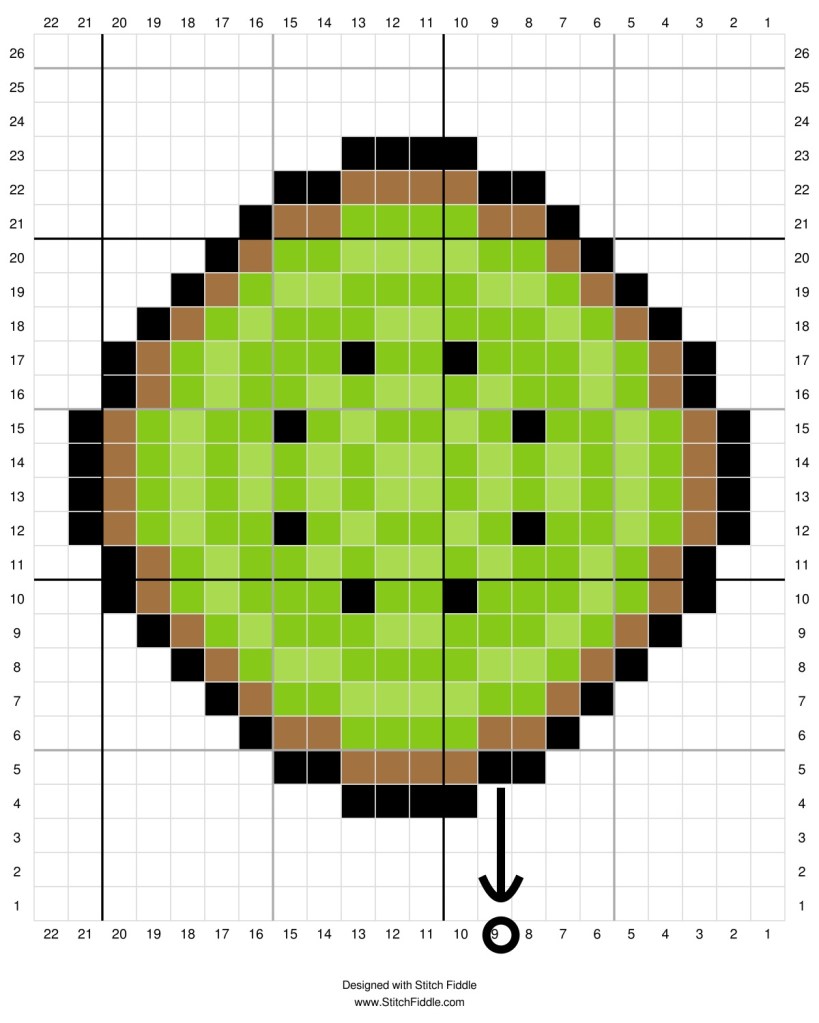
The nice thing about crochet graphs is that they’re numbered by rows. Technically you could start in any corner you want provided that you keep up with where you are in the graph, but the easiest place to start is in the bottom right hand corner.
I’ve marked the exact square you would start in on this graph.

Which direction to go in?
Starting in the bottom right hand corner, you will be working from right to left from the bottom up.
When you get to the end of row 1, you will turn and continue back across that row, working row 2 on the wrong side. You’ll repeat this process for each row in the graph. Row 3 will be on the right side, row 4 on the wrong side, and so on, and so forth.
It’s important to keep up with right and wrong sides whenever you’re working from a graph with color changes because the wrong side will look a bit messier than the right side since you’ll be using that side to hide and carry your yarn during color changes.

The numbers on the left and right hand sides indicate what row you’re on, which gives you something to look back on in case you lose track. It can be a little tricky on the eyes to squint at a graph for hours on end when the rows aren’t numbered!
Sometimes even number rows will be on one side and odd number rows will be on the other side.
If you follow along with the numbers along the bottom they can help you determine how many squares you need to work before you need to change color–again, very helpful on the eyes.
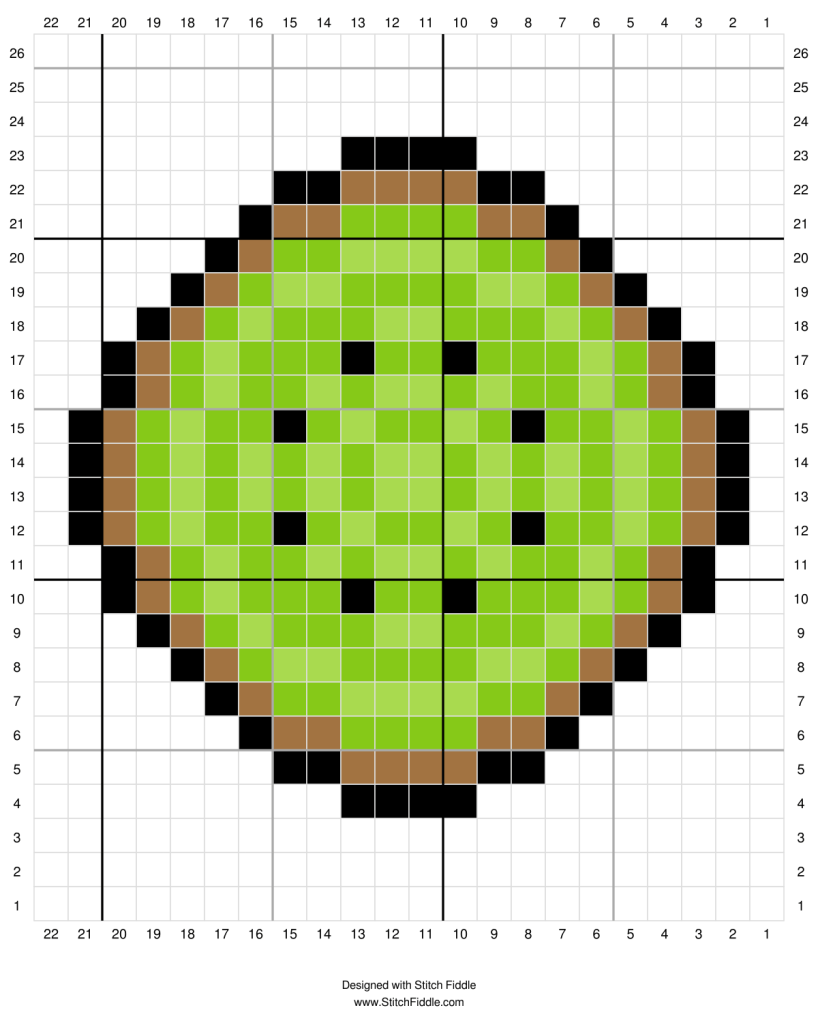
For example, with this kiwi graph you’ll work 3 rows of white single crochet with no color changes, but when you get to row 4, you can see that there’s a couple of color changes in the row. If you find the last white square before the black squares in row 4, you can look directly under it and find a number telling you how many white squares to work instead of having to squint at the graph and count them out one by one.
In this case you can see that you’d need to work 9 white stitches before switching over to black. You can use this trick for any row with a color change and it definitely makes things easier on you!
Reading a graph for C2C (corner to corner) crochet: What’s the difference?
This is slightly different in both concept and method. Tapestry crochet is typically worked in single crochet, one single crochet stitch for each square in the graph, and C2C is worked in “blocks”, one block of 3 double crochets for each square in the graph. Another big difference is the direction. With tapestry crochet you’re working back and forth in rows from the bottom up, and with C2C crochet you’re working diagonally from one corner to the next. So you would need to read the graph accordingly.
Sometimes C2C graphs are numbered a little bit differently since they’re meant to worked diagonally rather than from the bottom up. But you can still always use a regular graph for working corner to corner; it just might require you paying a bit more attention to the row you’re on.
You can actually start in either the bottom left or right hand corner for C2C crochet–your choice just as long as you keep up with what direction you’re working in!
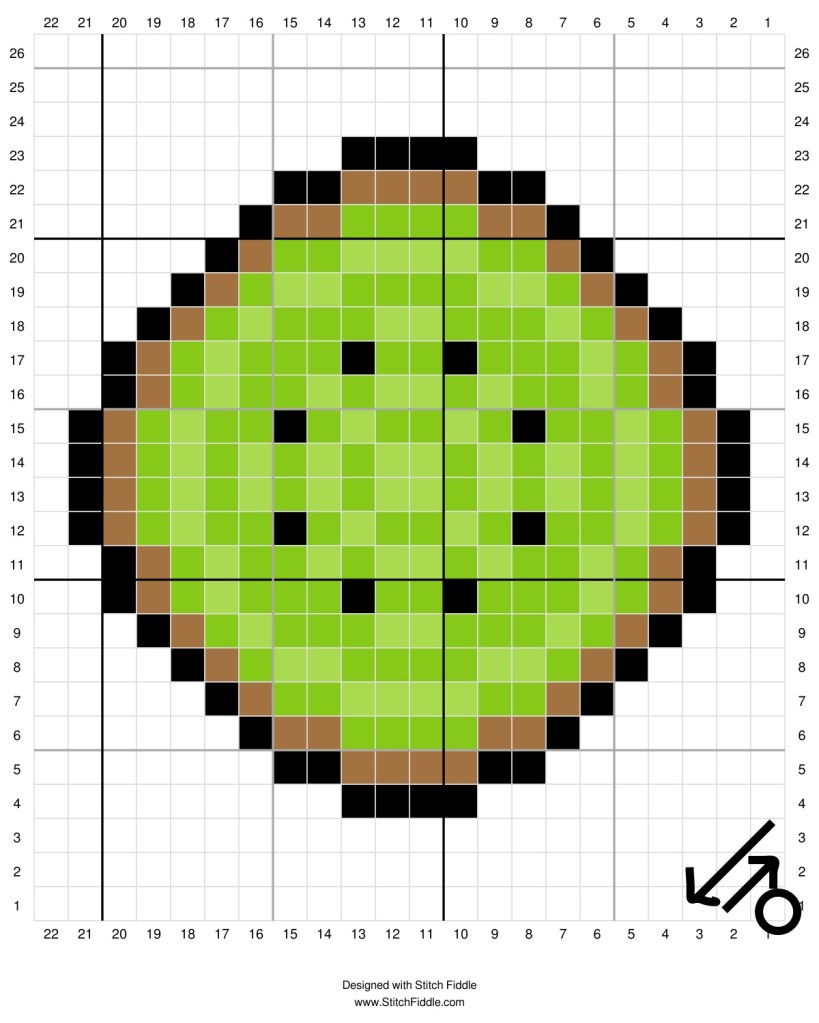
But for the sake of this tutorial, let’s just keep it simple and start in the bottom right hand corner, just like with tapestry crochet.
Which direction to go in?
Remember, you’re going to be working diagonally from the bottom right hand corner all the way up to the top left hand corner. So you’re going to be reading the graph in that exact same manner, like so.
So you’ll work the first row on the right side, then turn and work row 2 on the wrong side, and so on, and so forth.
The main difference is going to be the direction you’re working!
You can still see those helpful little numbers on the sides that indicate which row you’re on.
Helpful tips and resources
Some common mistakes beginners tend to make when reading graphs are:
- Starting in the wrong corner
- Working in the wrong direction
- Miscounting stitches or rows
- Running into issues during color changes
Not to worry–these mistakes are super common and can be fixed with simple solutions!!
If you have trouble remembering what corner to start in or what row or stitch you’re supposed to be working, it definitely helps to print out your graph on paper and make some marks on it. You can always circle the bottom right hand square as your starting point and circle each row number as you complete it. This also helps you not strain your eyes so much as you would squinting at a screen.
If you have trouble determining what direction you should work a row in, remember that if you start row 1 on the right side then all odd number rows will be worked from right to left while all even number rows will be worked from left to right. Remember, some graphs list even number rows on one side and odd number rows on the other side. This is super helpful!
If you aren’t super comfortable with color changes or want to know the best way to handle all the loose yarn ends, there are tons of resources on color changes for both tapestry and C2C crochet. YouTube is a great place to start but stay tuned for more tutorials coming soon on my blog and channel!
Until then, this video explains how to change color in tapestry crochet and this short video explains how to change color when you’re working on the wrong side of your work. This video also has some pretty helpful tips for tapestry crochet. Check out this video for changing color in corner to corner crochet.
Lots of people say that color changes and weaving in a ton of yarn ends are the most intimidating part about tapestry crochet and working from graphs and I completely agree, but once you get those skills down, reading graphs and turning pictures into intricate designs will be a breeze.
If you’d like a simple graph to start with that uses only two different colors, feel free to download this little heart graph I designed!
If you’re interested in learning to design your own graphs, I strongly recommend Stitch Fiddle. I’ve been learning on this website myself and so far I’ve been able to do everything I’ve needed to do with the free version.
Keep practicing the basics until you’re comfortable with reading a graph and frequently changing color. If you feel intimidated by multiple color changes, start with a simple graph with only two different colors until you get the hang of it.
You’ve got this!
I hope this tutorial was helpful!! Let me know in the comments if you get stuck or have any questions.


Leave a comment